
How to get pfSense IPsec VPN to work with BB10
While travelling I sometimes need to access files on my home server. As I investigated the options available to me, I found that BlackBerry 10 does not support Consumer grade VPN connections like OpenVPN. This complicated things a bit.
Fortunately I was able to piece together enough information to build a solution. The pfSense firewall really saves the day here!
References
- pfSense firewall [pfsense.org]
- IPsec Road Warrior/Mobile Client How-To [doc.pfsense.org]
- BlackBerry Z10 & Mobile IPsec on 2.1 WORKING! [forum.pfsense.org]
- PPTP and squid access denied messages [forum.pfsense.org]
Prerequisites
- The pfSense firewall should be installed and working in your environment. I've had a few adventures here in the past:
- Virtualized pfSense 2.0.3 and ESXi 5
- PFSense v1.2.3: Traffic won't route after reboot
- pfSense 1.2.3, Portforwarding and firewall rules
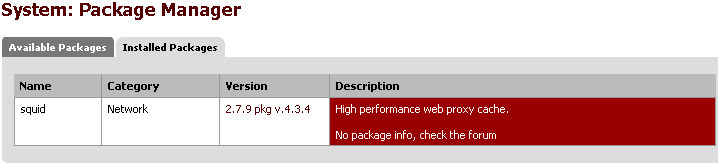
- The pfSense Squid package should be installed and configured. This can be done from the System -> Packages menu. When installed, you should see something like this:
- You should have a BlackBerry 10 device available for testing purposes. I'm using my Q10 running OS 10.3.1. In a way this is the most important part, since without something that reaches 'in' to my home network, there's no reason to do any of this configuration. :)
Things to configure - pfSense
We'll need to setup a few things in order for this to work:
- IPSec VPN in pfSense
- Basic configuration
- Phase 1 setup
- Phase 2 setup
- VPN User configuration
- Firewall Rules
- NAT Rules
- SQUID ACLs
Mobile IPSec Configuration
In PFSense version 2.1.5, enabling IPSec is fairly straight forward: Click on the VPN -> IPSec menu and make sure the Enable IPSec checkbox is checked

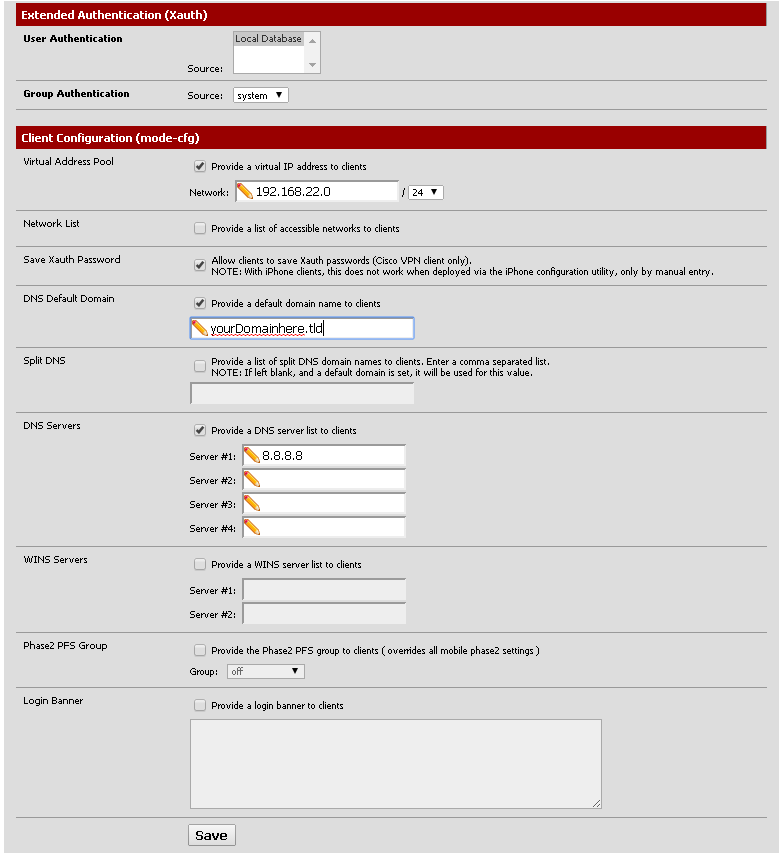
Navigate to the Mobile Clients tab and make sure you have a configuration that looks something like this:
- User Authentication: Local Database
- Group Authentication: system
- Virtual Address Pool: Check the box next to 'provide a virtual IP address to clients
- Be sure to specify a network range that that is currently unused in your environment!
- Network List: Uncheck the box next to 'Provide a list of accessible networks to clients
- Save Xauth Password: Check the box net to 'Allow clients to save Xauth passwords'
- DNS Default Domain: Check the box next to 'provide a default domain name to clients'
- Specify a domain name that is applicable for your environment
- Split DNS: Ensure this option is unchecked and that there is no entry in the box
- DNS Servers: You can try enabling this and entering your DNS servers, but it didn't work for me.
- WINS Servers: Not really applicable to my scenario, so I left this unchecked
- Phase2 PFS Group: Make sure this is unchecked
- Login Banner: I didn't mess with this, looks like I can send a message to clients that connect which could be interesting down the road.
For reference, here is a screen-cap of my configuration:
IPSec Phase 1 Setup
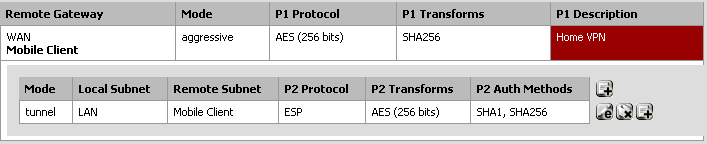
In the VPN -> IPSec area, click on the Tunnels tab. If you do not see an entry there that looks like this, click the plus button to add one:

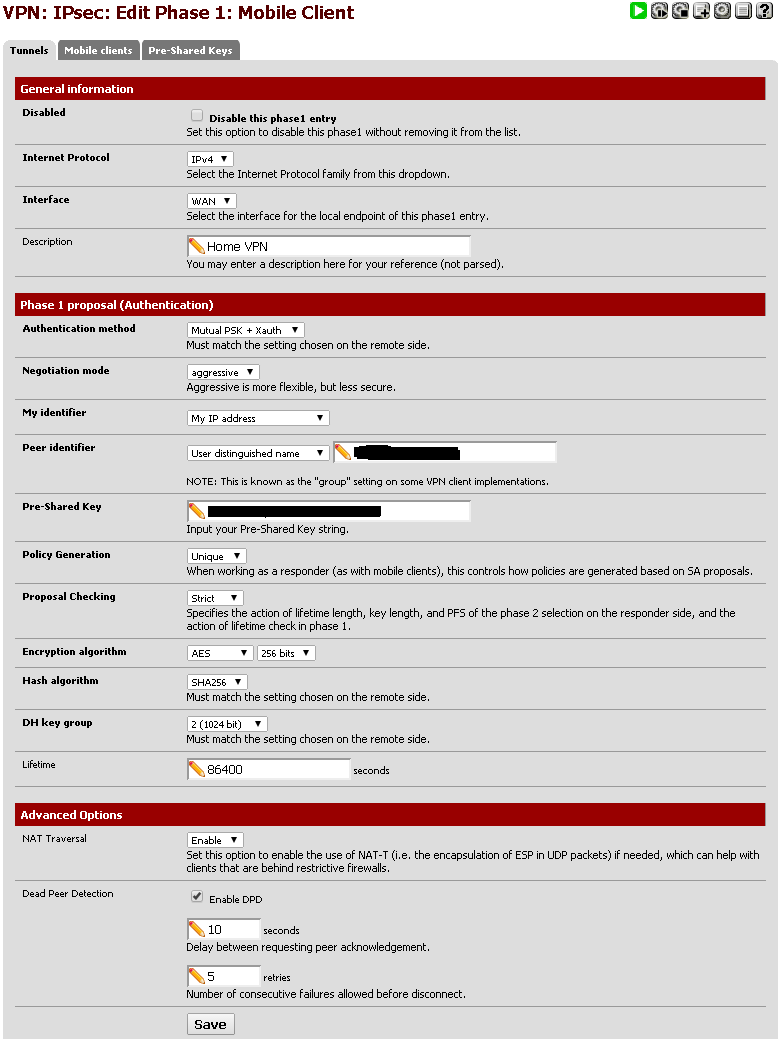
When configuring a Phase 1 Setup make sure to select options like this:
- Internet Protocol: IPv4
- Interface: WAN
- Description: Something that makes sense to describe your VPN setup
- Authentication Method: Mutual PSK + Xauth
- Negotiation mode: aggressive
- My identifier: My IP address
- Peer identifier: User distinguished name
- Pick something in the format of an email address like vpnusers@domain.tld
- This could be known as the 'group' in some vpn clients
- Pre-Shared Key: Set this to be the shared secret. You'll want this to be secure. Remember that you'll need to give it to everyone who wants to access your VPN.
- Policy Generation: Unique
- Proposal Checking: Strict
- Encryption algorithm: AES 256 bits
- Hash algorithm: SHA256
- DH key group: 2 (1024 bit)
- Lifetime: 86400 seconds
- NAT Traversal: Enable
- You may not need this if you don't use the NAT
- Dead Peer Detection: Check the box next to 'Enable DPD'. Leave the settings at their defaults
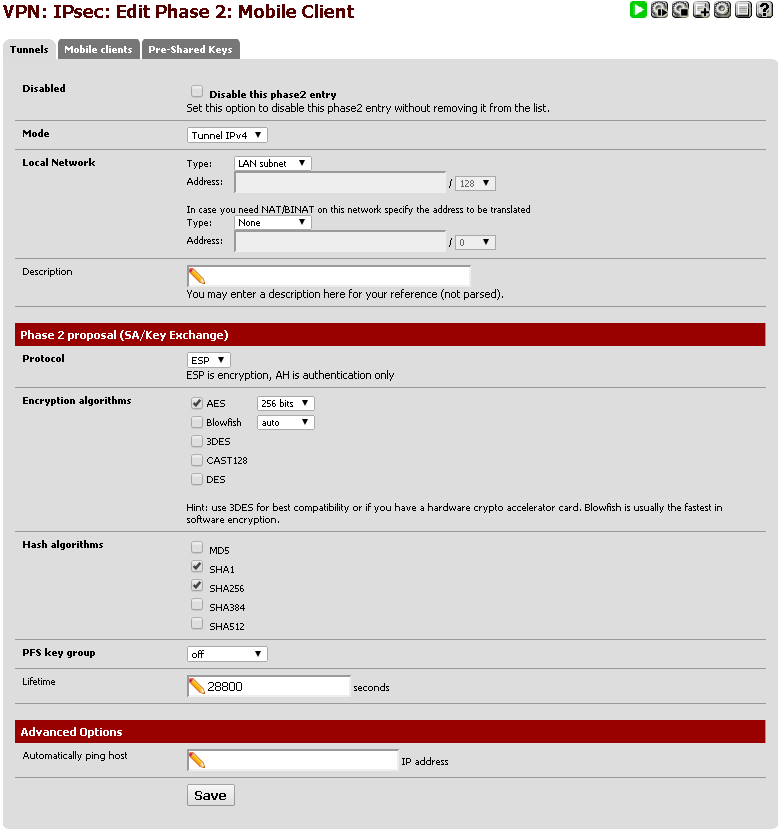
IPSec Phase 2 Setup
Phase 2 configuration lets us setup a tunnel. On the Tunnels tab of the VPN -> IPSec page, you should see an option to either add or show Phase-2 entries. If one doesn't already exist, click the add button to create a new one. This is what a configured Phase 2 tunnel entry looks like:
When configuring a Phase 2 configuration, ensure that your options look something like this:
- Mode: Tunnel IPv4
- Local Network: Select 'LAN Subnet' for the first entry, leave the second set to 'None' (See screenshot for details)
- Description: You can enter a descriptive string here that could help you remember what this is for (VPN tunnel for mobile clients)
- Protocol: ESP
- Encryption algorithms: AES 256 bits, ensure all other options are disabled
- Hash algorithms: SHA1 and SHA256 should be selected. Other options should not be selected
- PFS key group: off
- Lifetime: 28800 seconds
- Automatically pinghost: leave this empty
At this point all the basic VPN configuration has been completed. We just need to create credentials and set permissions to allow users to connect.
VPN User Configuration
Out of the box pfSense uses a local username/password database that we can piggy back on to grant user access to our VPN. To add a user with sufficient rights to be a VPN user:
- Navigate to System -> User Manager. You should see a screen that looks like this:
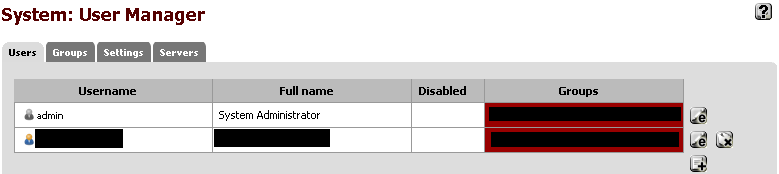
- Click the Plus button to add a new user (Should be in the lower right-hand corner of the user grid)
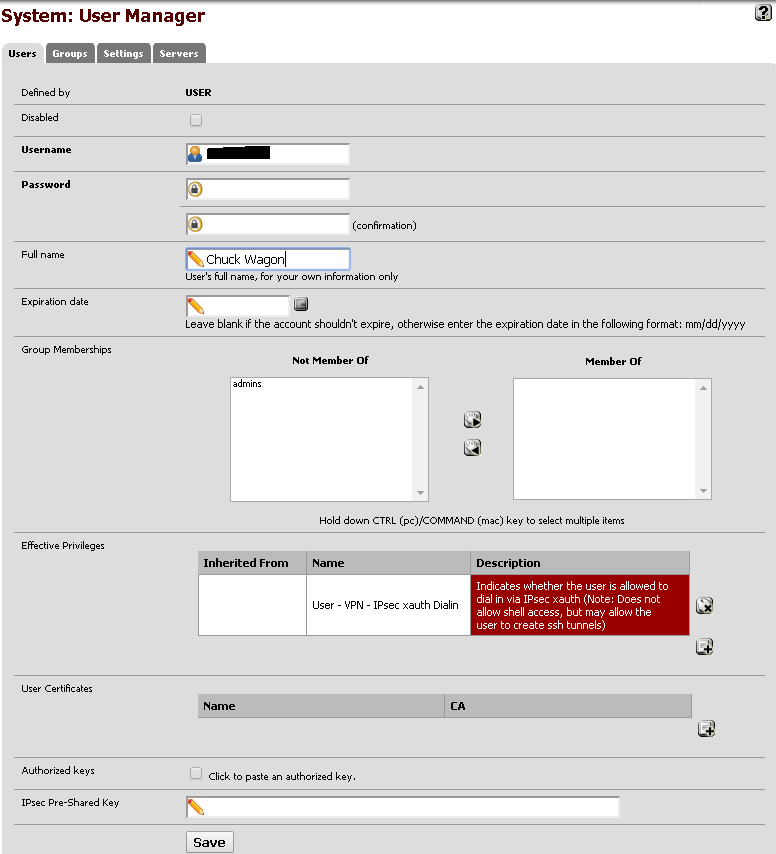
- Create a new user with settings like this:
- Username: username of your choice
- Password: Make sure you select an appropriately complex password!
- Full Name: Optional, useful for tracking purposes
- Expiration Date: Optional, useful for temporary access
- Group Memberships: You could do permissions based on group, this example does it by user
- Effective Privileges: Ensure you pick User - VPN - IPsec xauth Dialin
- User Certificates: For this type of VPN, no user certs are required
- Authorized keys: Leave this box unchecked
- IPsec Pre-Shared Key: Leave this box empty
The User configuration screen should look like this:
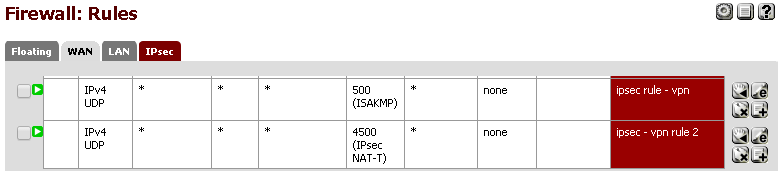
Firewall Rules
Now that we have finished the IPSec and User setup, we need to ensure that the Firewall will allow traversal of the IPSec VPN packets. To do this, navigate to Firewall -> Rules and add a couple rules that look like this:
NAT Rules
If you have Manual Outbound NAT configured, you'll need to deal with the IPSec rules yourself. Make them look like this to start with, then tighten them up over time:
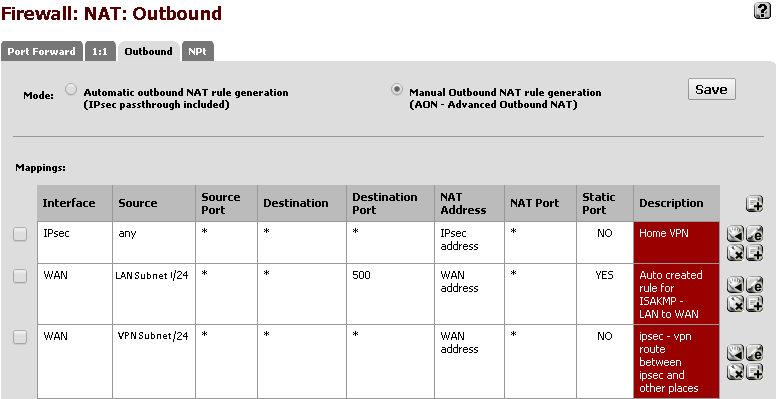
There are 3 rules here:
- IPSec interface rule which ensures that traffic coming in from IPSec can go where it needs to go
- An auto-generated rule from the LAN Subnet for port 500
- A manually generated rule by me to ensure that the VPN Subnet will work correctly. Not totally sure if this is necessary, but it seems to work
SQUID ACLs
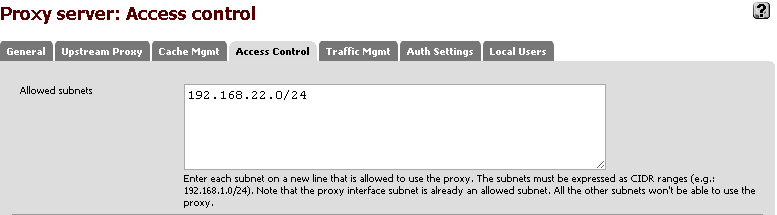
Now that everything else is configured on the pfSense side of things, the last thing we need to do is ensure that VPN users can access the squid cache. This is necessary if you want VPN users to have browser/web access when connected to VPN. Fortunately, this is very simple to do:
- Navigate to Services -> Proxy Server
- Click on the Access Control tab
- In the Allowed subnets box, enter the CIDR format of your VPN range
End result should look something like this:
Connecting the BB10 Device
Now that we've got the heavy-lifting out of the way, lets configure the BB10 device!
Note: For reference, my BB10 device is connecting via 4G LTE internet. I'm not trying to connect to the VPN Over wifi.
Here's what we need to do to get the BlackBerry device to connect:
- Create a new VPN profile
- Manually specify the DNS server
- Manually specify the Proxy server
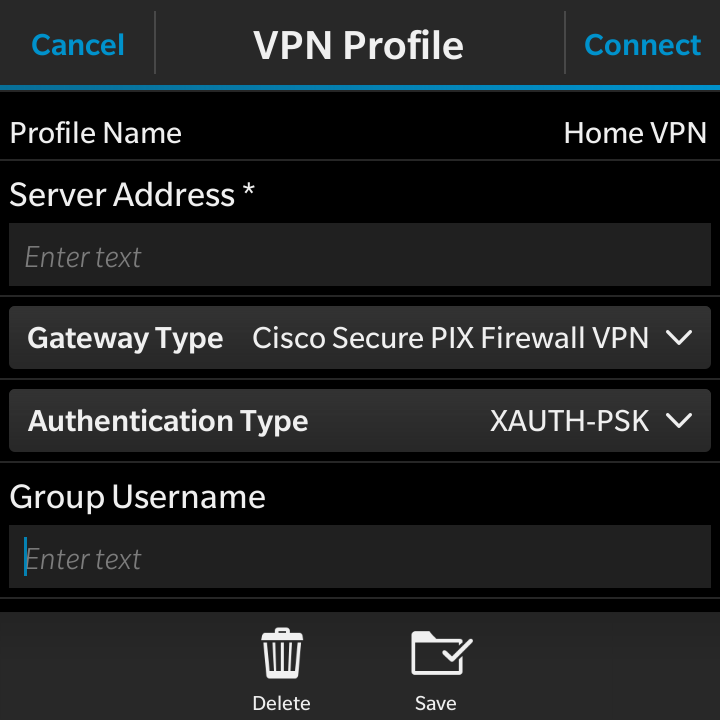
Create a VPN profile:
- Navigate to System Settings -> Networks and Connections
- Tap on the VPN option
- Tap the Add button
- Fill out the following settings (Screenshots follow)
- Server Address: Either the DNS name or IP address of your VPN server
- Gateway Type: Cisco Secure PIX Firewall VPN (I didn't try other options)
- Group Username: This could be vpnusers@domain.tld or whatever you specified back in the IPsec configuration options
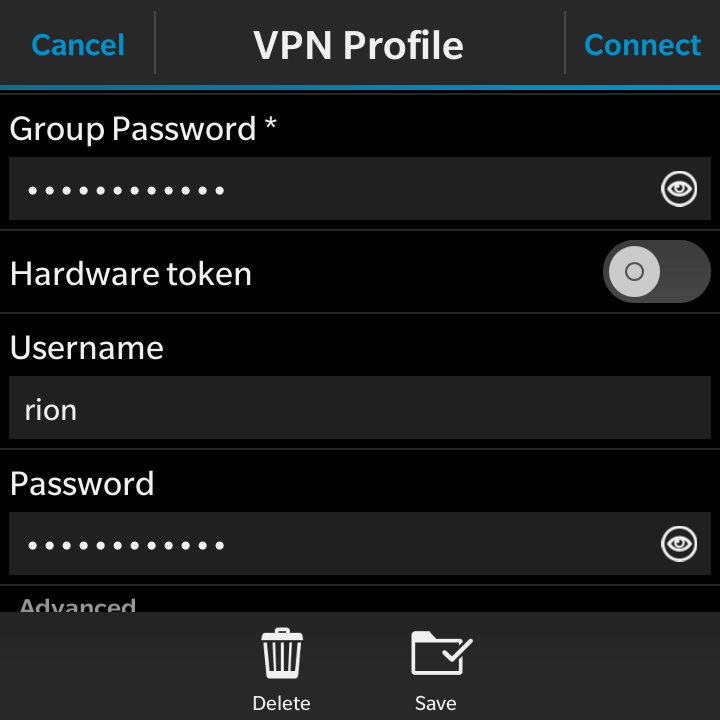
- Group Password: This is the Pre shared key you configured back in the IPsec setup
- Hardware Token: Ensure this is NOT selected
- Username: Enter the username you created in User Manager
- Password: This is the password that corresponds to the username
- Automatically determine IP: Ensure this is selected
- Automatically determine DNS: Ensure this is not selected
- Primary DNS: Enter your local DNS server. In my case it is the same IP address as the pfSense LAN interface since I have my pfSense box acting as a DNS forwarder
- Secondary DNS: Enter this if you have one
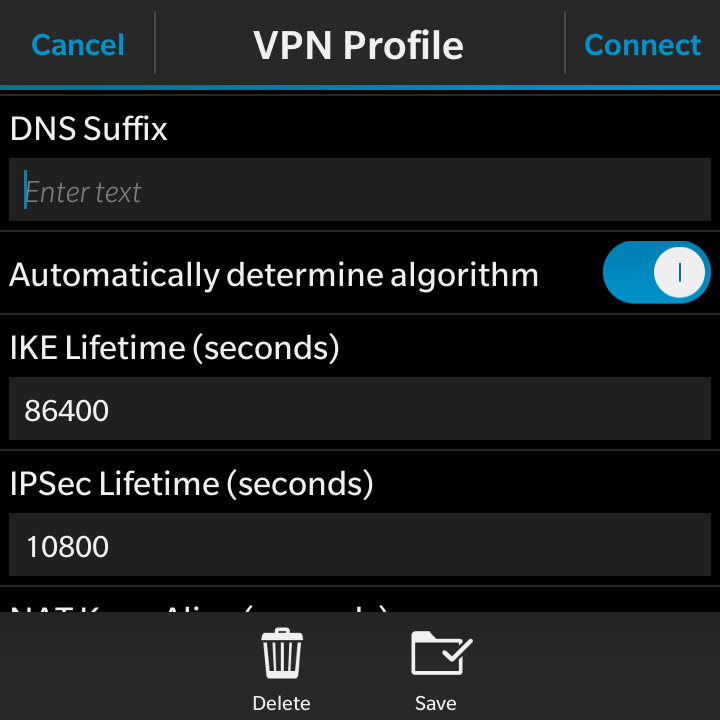
- DNS Suffix: Enter this if you have one
- Automatically determine algorithm: Ensure this is checked
- IKE Lifetime (seconds): 86400
- IPSec Lifetime (seconds): 10800
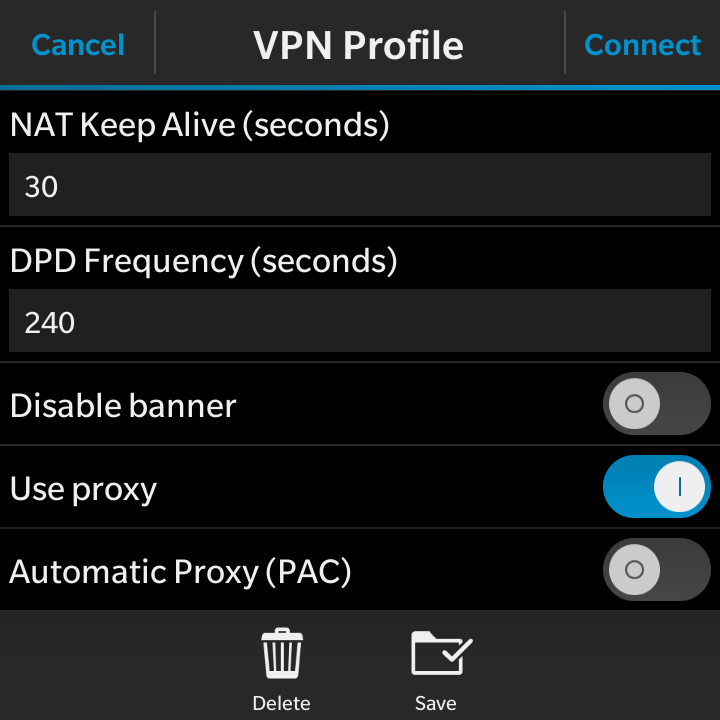
- NAT Keep Alive (seconds): 30
- DPD Frequency (seconds): 240
- Disable banner: This can be enabled or disabled, your choice
- Use Proxy: If you want internet access and configured the SQUID ACLs in pfSense, ensure this is selected
- Automatic Proxy (PAC): Disabled
- Proxy Server: IP Address or dns name of your proxy server. In my case its the same LAN IP address of the pfSense server
- Proxy Port: Defaults to 3128
- Username: If you secured your proxy server in pfSense, enter the proxy username
- Password: If you seecured your proxy server in pfSense, enter the proxy password
- Tap the Save button

End Result
At this point you should be able to connect to the VPN profile and gain access to your home network even when you are away.