
Virtualized pfSense 2.0.3 and ESXi 5
After running pfSense 1.2.3 for over 1000 days, I decided to move to the latest release. Rather than update the version that is installed on dedicated hardware it seemed like a better idea to run it as a VM on my home ESXi server. This way I can make better utilization of the ESX box (which consistently runs below 30% utilization) and free up the other box to be a dedicated backup server.
Getting things setup took a few hours. I guess my skills get a bit rusty when I wait 3 years to make any major changes to my pfSense configuration.
References
- pfSense Project Page [pfsense.org]
- pfSense Downlaod Mirrors [pfsense.org]
Steps to Install and Configure pfSense 2.0.3
After banging my head on a few things, I found a process that worked for me. My goal was to have a LAN and a WAN with NAT enabled
Install
- Download the .ova for pfSense (available at any download mirror)
- Open up the vSphere Client and select File -> Deploy OVF Template...
- Run through the wizard to configure the Virtual Machine
Configure VMWare / ESX / VM Settings
- Add enough Virtual Switches to your ESXi environment to allow for any network segmentation you need. In my case I added one vSwitch that is bound to the ethernet port on the ESXi box which has internet access
- Edit the pfSense VM Settings and add enough Virtual NIC cards to connect to the 'internet' vSwitch and any others that need access to the pfSense router firewall
- Make a note of the MAC Addresses for the Virtual NICs. We may need them later on
Configure pfSense
- Start the pfSense VM
- At the command line, configure the WAN and LAN Interfaces.
- Make Sure to bind the interaces to the correct Ethernet Interface. If you don't do this you'll run into problems later on
- Login to the Web Interface
- Go to System -> General Setup and make sure you have DNS Servers configured
- I found that I had to select the WAN option from the drop-down menu beside each DNS item for it to be recognized
- Go to Firewall -> NAT. Select the Outbound tab
- Select the Automatic outbound NAT rule generation radio button and click Save
- I like to turn around and select the Manual Outbound NAT rule generation radio button so I'm a bit more control of the NAT settings going forward. Using the 'automatic' mode at first helps setup the tedious NAT and Firewall rules.
- Enable DNS on the LAN interface by selecting Services -> DHCP Server. Select the LAN tab and configure the settings to your liking
Issues That I Encountered
As I mentioned above, it took me a few hours to get everything setup. I ran into 2 problems which I'd like to describe here for anyone else who may run into similar problems.
Problem 1: ISP MAC Address expectation
After running through the basic setup I found that I could not ping anything using the Diagnostics -> Ping tool in the web ui. After wracking my brain and trying a few things I found that I could get traffic routing by spoofing the ESXi box's physical NIC MAC Address. I guess my provider (Veracity in utah) expects the MAC Address that connects to their network to be the one that routes traffic to/from their network.
The VMWare MAC Address that was assigned to the pfSense VM was not good enough for the ISP. Fortunately you can go to Interfaces -> WAN from within the Web UI and setup a MAC Address spoof.
Problem 2: Cross-wired my Virtual NICs
Before encountering the MAC Address issue I found that I hadn't set the WAN interface to the correct Ethernet adapter in the VM. It is a little hard when pfSense calls them em0, em1, emX to know what you are picking.
Fortunately, you can check the VM Settings and compare them to the Interfaces -> Assign menu from the pfSense web ui and correct any mis-configurations:
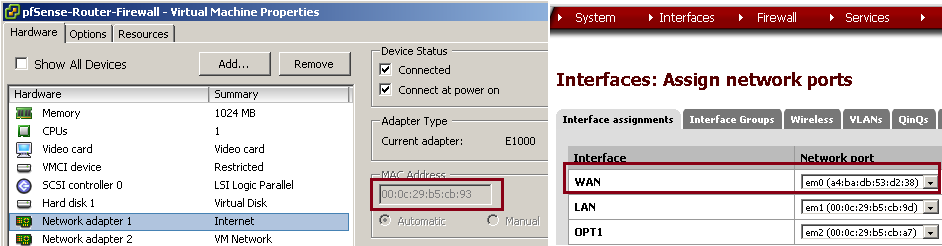
This screenshot was taken after I spoofed the WAN MAC Address. Before spoofing I was able to see that the WAN interface was set to the 'VM Network' vSwitch rather than 'Internet' vSwitch. It was only a quick change to make and was pretty painless
Problem 3: Can't ping any DNS name
After getting things setup to my liking I couldn't ping any DNS names. I could only ping IP Addresses. One place online suggested going to Diagnostics -> States and Reset the state table. This did not work for me.
I ended up restarting the VM and after that I could ping to my hearts content.
Final Word
Overall I rather enjoy pfSense. In my experience it has proven itself to be reliable, speedy and configurable. Once you get past the weirdness in setting up firewall rules (and remembering to make a corresponding firewall rule for each NAT rule), it is very powerful and relatively easy to maintain.
Here's hoping for another 1000 days (unless I upgrade sooner)!