
VLAN Configuration across Mikrotik CRS310 and OPNSense 24.7.2
I'm in the process of replacing my aging pfSense deployment with a combination of new OPNSense setup and a Mikrotik CRS310-8G+2S+IN. This lets me run 2.5Gb Ethernet as an upgrade from the 1Gb that I've been accustomed to. For now I'm only upgrading 2 network segments with corresponding VLANs. With my new 5Gb Fiber Internet connection(!) I'd like to provide a way for the network to make use of the improved speed.
This is a comprehensive guide on how to configure VLANs across OPNSense and Mikrotik.
References
- CRS310-8G+2S+IN [mikrotik.com]
- OPNsense Download [opsense.org]
- Mastering VLAN Configuration on MikroTik, Step-by-Step Guide [youtube.com/@TheNetworkBerg]
- How to Configure VLANs on OPNsense [zenarmor.com]
- How to Configure VLANs in OPNsense [homenetworkguy.com]
- Basic VLAN switching (Mikrotik) [help.mikrotik.com]
- L3 Hardware Offloading (Mikrotik) [help.mikrotik.com]
- Updating MikroTik Router from the command line [mivilisnet.wordpress.com]
Target State
The goal is to have a network configuration resembling this:
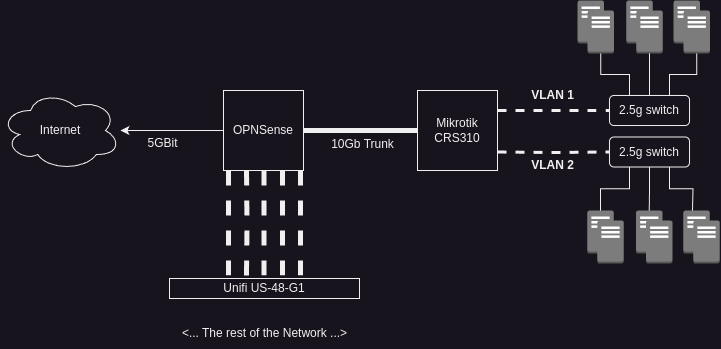
Putting the diagram in words:
OPNSense acts as the internet router and has 5 NIC ports dedicated to different network segments, each feeding different port groups on a Ubiquiti Unifi 48 port Managed Switch. A 10Gb Intel NIC is dedicated to the connection between OPNSense and the Mikrotik device, handling the VLAN trunk.
I need the Mikrotik to operate at line rate as one of the points of upgrading to 2.5Gb Ethernet is to improve internet connectivity and if the Mikrotik can't sustain full 2.5Gb speed then there's not much value from the higher Layer 2 negotiated speed.
Configuration of the Mikrotik CRS310-8G+2S+IN
The Mikrotik device arrived with a bridge pre-configured and all of the ports included in the bridge configuration. It defaults to an IP address of 192.168.88.1 and I had to set a static IP address on my laptop (using a USB Ethernet adapter to not disrupt typical network functions) to access the management interface. I had to configure 2 things:
- Router IP address
- VLANs and port assignments
I'll be using the Web GUI to perform configuration and eventually plan on mastering the intricacies of the CLI.
The steps below will leverage the hardware offloading capability of the Mikrotik by limiting the configuration to one bridge. My Mikrotik device can only have one 'hardware accelerated' bridge, which is sufficient for my needs as I can map VLANs to bridge ports and accomplish my network segmentation goals.
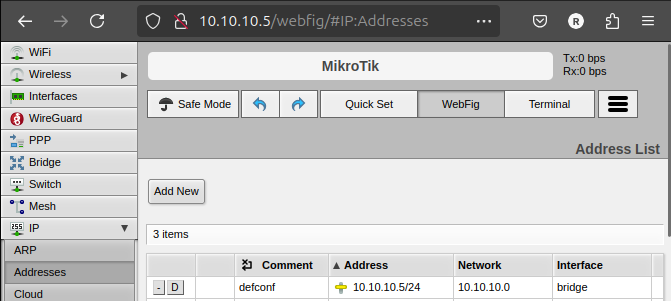
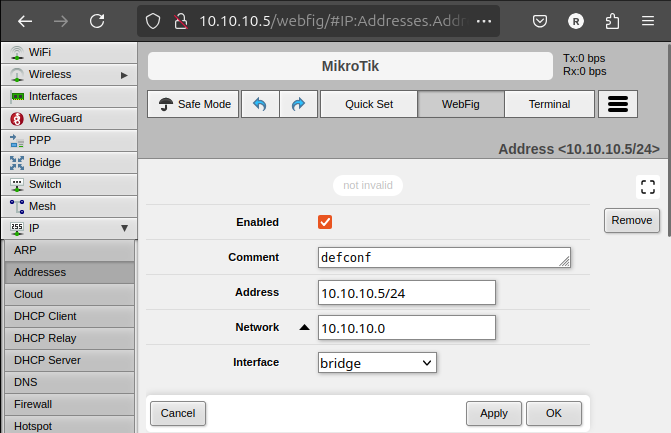
Network / Device IP Configuration
To change the management interface IP address, I had to adjust the 'bridge' IP address to fit in my management network range:
- Login to the WebFig Configurator (http://192.168.88.1)
- Navigate to IP -> Addresses
- Click on defconf (that's the name of my bridge)
- Set the IP Address and network range
- Click Apply and OK
- Reboot the device
VLAN Configuration
VLAN configuration consists of the following steps:
- Conceptualize and Define your VLAN strategy
- Set VLAN IDs on bridge ports
- Set VLAN tagged and untagged interfaces
- Set IP Addresses associated with VLAN Interfaces
- Enable VLAN Filtering on the bridge
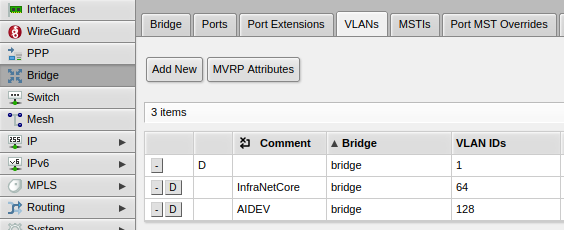
VLAN Strategy: For now I'm only defining 2 VLANs:
- 64 - InfraNetCore
- 128 - AIDev
I followed these steps to configure two VLANs on 2 different interfaces of the Mikrotik:
- Access the WebFig UI (using your new IP Address as configured above)
- Navigate to Bridge -> Ports and ensure that your interfaces are all associated with the bridge:
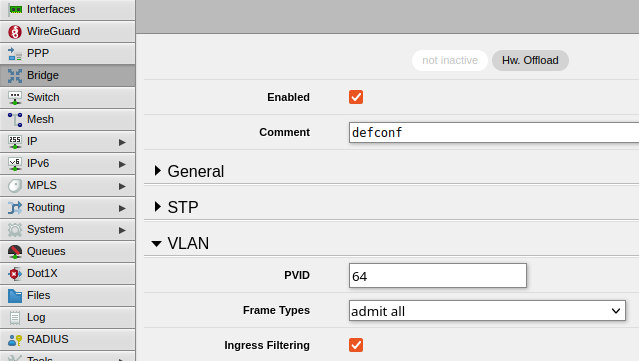
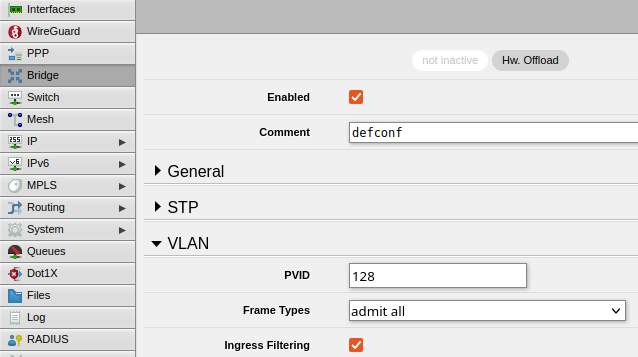
- For each interface, click on it and expand the VLAN section. Set the PVID value to your VLAN IDs:
- ether2
- ether4
- Be sure to click Apply then OK to ensure the configuration is saved
- This step allows us to plug in a device to an interface on the Mikrotik and have it join the VLAN without having to configure any VLAN Tagging on the device itself. Essentially it reserves a specific port/interface for a particular VLAN
- ether2

Next, I need to configure the Tagged and Untagged interfaces for the VLANs on the Mikrotik:
- Access the WebFig UI (using your new IP Address as configured above)
- Navigate to Bridge -> VLANs
- Click the Add New button and fill out the screen so it looks something like this:
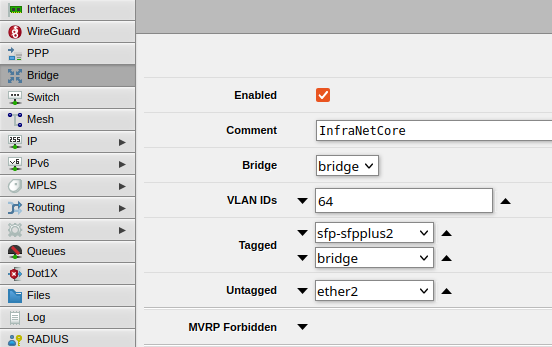
- The key fields include:
- Comment: Fill this in so you can be reminded about the purpose of the VLAN
- Bridge: If you are like me then you have only 'one' bridge to take advantage of hardware acceleration, so this should be easy to set
- VLAN IDs: Only enter ONE VLAN ID here
- Tagged: These are the interfaces where VLAN tags have to be applied. bridge should be added here along with your Trunk Interface, which in my case is sfp-sfpplus2
- Untagged: These are the interfaces which don't require VLAN tags - in other words, a device can just 'plug in' to join the network without any additional configuration. In my case, I'm only enabling ether2 here
- Click Apply then OK to save the configuration
- As I have a second VLAN, I went through the same process again for a different VLAN ID and interface combination:
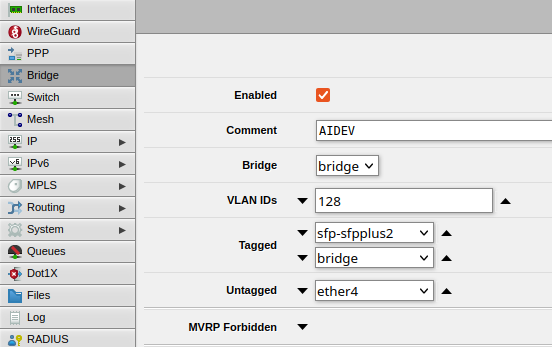
- The key fields include:
- Comment: Fill this in so you can be reminded about the purpose of the VLAN
- Bridge: If you are like me then you have only 'one' bridge to take advantage of hardware acceleration, so this should be easy to set
- VLAN IDs: Only enter ONE VLAN ID here
- Tagged: These are the interfaces where VLAN tags have to be applied. bridge should be added here along with your Trunk Interface, which in my case is sfp-sfpplus2
- Untagged: These are the interfaces which don't require VLAN tags - in other words, a device can just 'plug in' to join the network without any additional configuration. In my case, I'm only enabling ether4 here
- The key fields include:
- Click Apply then OK to save the configuration
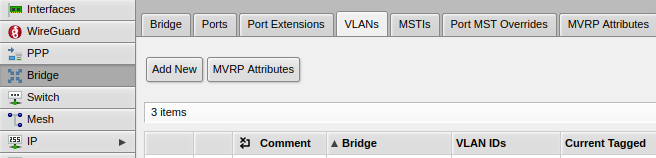
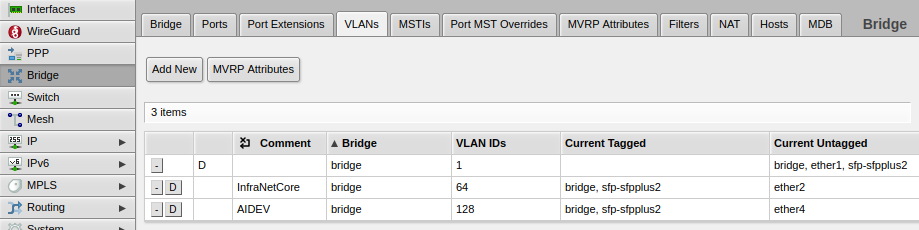
- This what the final result looks like (I see VLAN 1 was already configured out of the box on my Mikrotik):
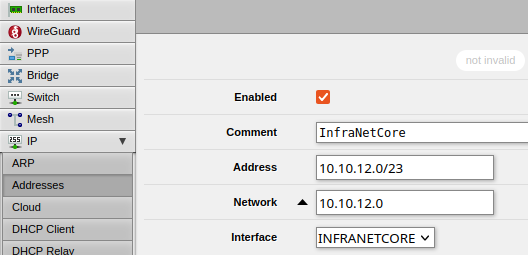
Next, Set the IP Addresses associated with the VLANs:
- Access the WebFig UI
- Navigate to IP -> Addresses
- Click on Add New and add your VLAN Address range:
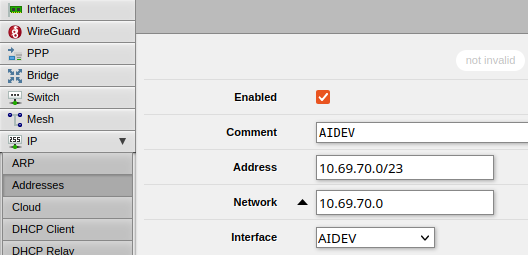
- Field Descriptions:
- Enabled: Fairly self-explanatory. Ensure the box is checked if you want this to work
- Comment: Fill in details that will help you remember why you configured this. I entered the name of my VLAN as a reference
- Address: I entered the network id in CIDR format which appeared to work
- Network: This should auto-populate after you enter in the 'address'
- Interface: Select your VLAN identifier here
- Field Descriptions:
- Be sure to click Apply then OK
- I did this again for my second VLAN:
- The only difference in the 'fields' is that I selected a different address/network and VLAN interface (along with a different comment as well)
- Click Apply and OK to save the configuration
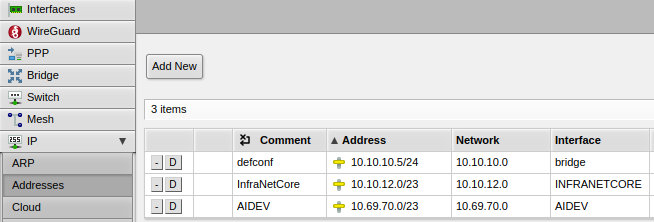
- Once through, your IP -> Addresses screen should look similar to this:
Finally, Enable VLAN Filtering on the bridge and reboot
- Power off / power on the device worked for me
- Access the WebFig UI
- Navigate to Bridge -> VLANs and you will see that the 'Tagged' and 'Untagged' interfaces show up correctly
As far as configuring the Mikrotik goes, that's it! Do some testing and validate your configuration.
Configuration of OPNSense
Enable the 10Gb Network Interface
In my environment I had to enable the second 10Gb interface on my NIC before I could proceed with VLAN configuration
- Login to the OPNSense WebUI
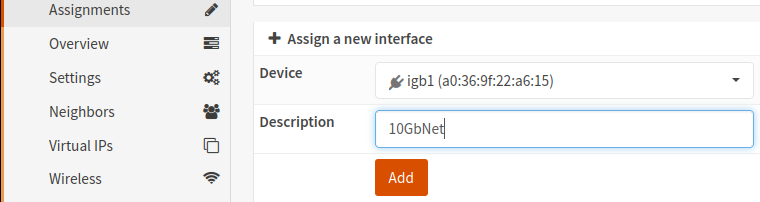
- Navigate to Interfaces -> Assignments
- Select your Device, enter a Description and click the 'Add' button
- Navigate to Interfaces -> 10GbNet (or the name you assigned to your 'trunk' interface)
- Click the checkbox to Enable Interface
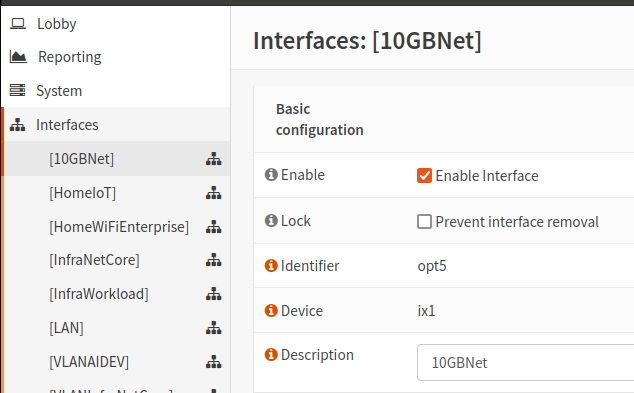
- IMPORTANT NOTE: Do not assign any IP address to this interface! At least in my setup assigning an IP address here didn't seem to 'do' anything and I like to minimize complexity and potential future troubleshooting burden. YMMV.
Create VLANs
- Login to the OPNSense WebUI
- Navigate to Interfaces -> Other Types -> VLAN
- Click the small '+' button (plus button) to setup a new VLAN
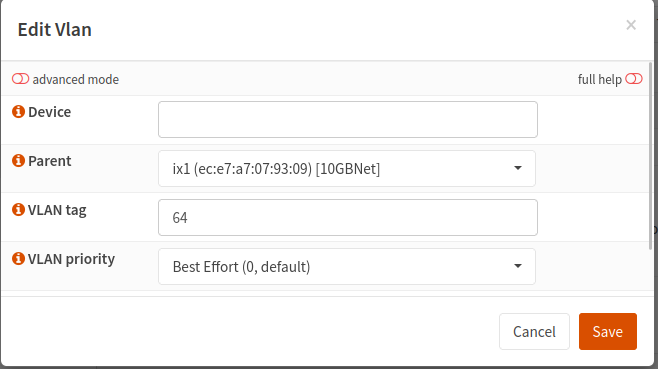
- Fill out the Edit Vlan screen with your VLAN information
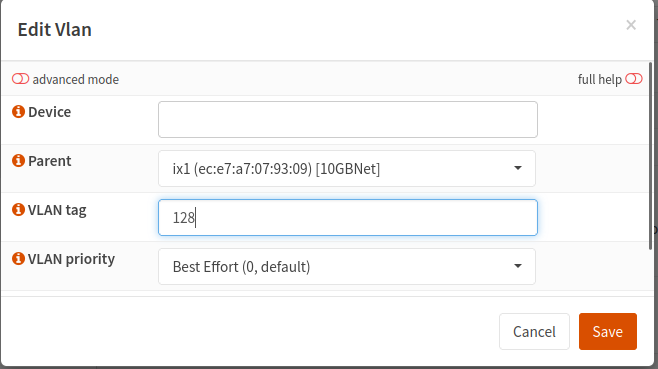
- Field Descriptions:
- Device: Just leave this blank unless you want to assign a custom device ID to your VLAN
- Parent: This is MOST IMPORTANT - be sure to select the PHYSICAL INTERFACE you are using as your trunk!
- VLAN tag: Enter the same value here you entered in the Mikrotik UI
- VLAN priority: I have no prioritization rules in place with these VLANs. You may want to consider a different priority if 'regular' effort isn't sufficient for your needs
- Click Save
- I filled it out a second time with information from my second VLAN:
- The only difference here is the VLAN ID
- Click Save
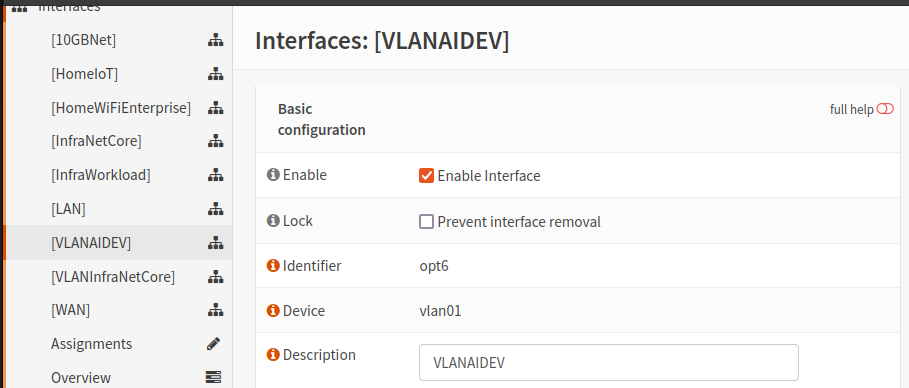
- Navigate to Interfaces -> VLAN Name
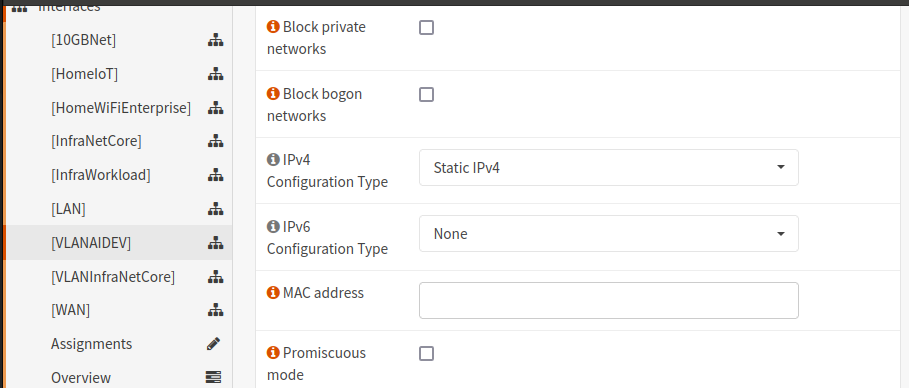
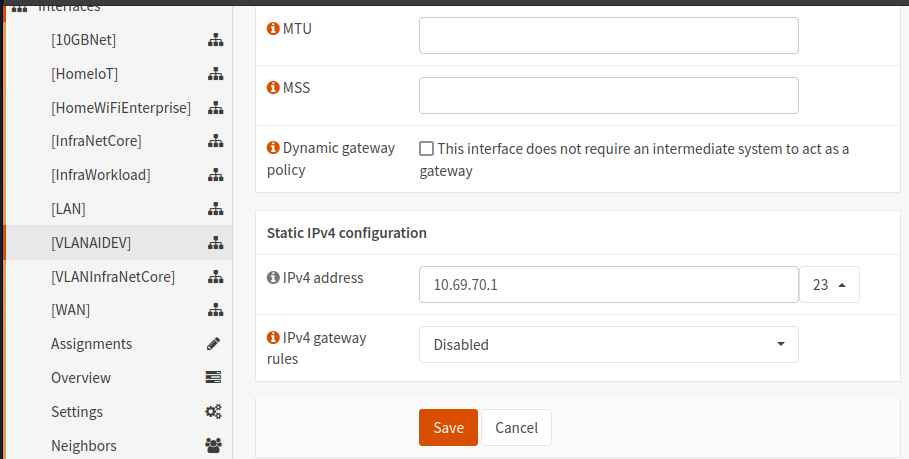
- Ensure that each interface is Enabled and that an IPv4 and/or IPv6 address are configured. In my environment I use IPv4 with a Static assignment
- Be sure to configure the Network Range associated with the VLAN Interface in CIDR format
- It will look something like this:
- Click the Save button

Configure VLAN Firewall rules
Without firewall rules, all traffic will be 'denied by default'. This section takes you through an extremely basic firewall rule setup
- Login to the OPNSense WebUI
- Navigate to Firewall -> Rules -> NameOfVLAN
- For my InfraNetCore VLAN, it should have WIDE access to all other networks within my environment, so the rules I've configured here are very broad. Please refine the firewall rules to meet your needs:
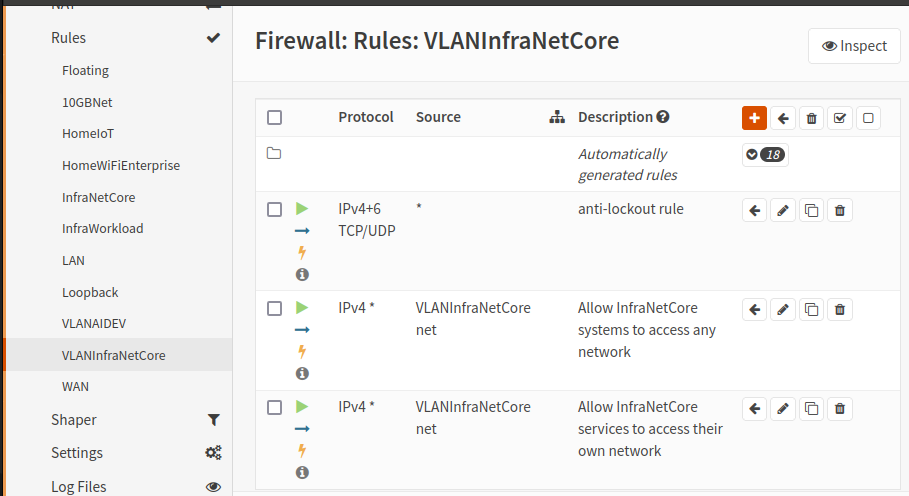
- Effective rules:
- Allow any IPv4 traffic entering the OPNsense firewall from this VLAN to have access to any device on its own VLAN or any other network (VLAN or physical) in the environment
- Rather than show the much more complicated set of rules for my other VLAN, please explore the firewall rule builder to determine and implement rules which are appropriate for your needs.
Enable DHCP on VLAN ranges
I leverage my OPNsense device for DHCP across all of my network segments. This section describes how to setup DHCP on a VLAN in OPNSense.
- Login to the OPNSense WebUI
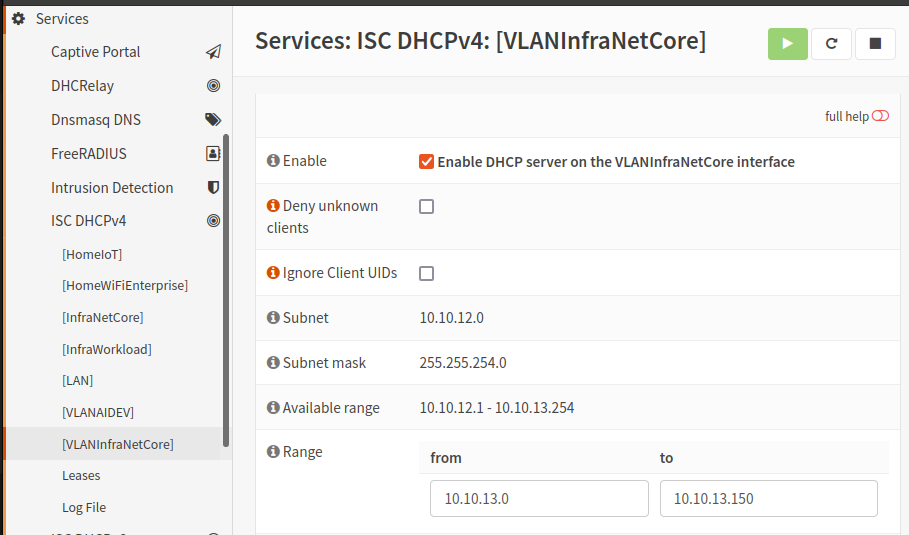
- Navigate to Services -> ISC DHCPv4 -> Name of VLAN
- Ensure that the checkbox to Enable DHCP server on the VLAN interface is checked
- Configure an IP range (within the network range defined on the VLAN interface)
- It will look similar to this:
- Click the Save button
- I did this again for my second VLAN interface:
- Click the Save button

Afterword
At this point if you wire up the trunk ports between OPNSense and the Mikrotik device you should have a functional network setup. I only have one other advice to leave: When configuring VLANs do not configure overlapping IP ranges with your existing network. I learned this the hard way and had rip and replace the configurations due to this error.