BlackBerry 10 Cascades: Create a Custom Control (DropDownList)
Last week I attended the BlackBerry Jam conference in San Jose (Conference recordings and samples available here). It was one of the most interesting events I've been to all year and I gained a lot by attending. With that said, there was a LOT of information presented and I felt like I was drinking from the firehose most of the time.
Now that I've had a few days to digest what was presented I've embarked on creating a few apps for the new BB10 platform. In applying my knowledge towards a goal (creating an app) I found a limitation in one of the core Cascades controls (DropDown) that I had to work-around by creating a custom control. This article will document how to create a simple custom control based on DropDown which will allow you to dynamically add additional Options to the DropDown using QML instead of C++.
14-Oct-2012 - I updated the code sample to resolve an issue reported in the comments. Also, See the bottom of the post for a way to accomplish this task WITHOUT using the custom control. RIM got back to me with a better way to do it. :)
19-July-2013 - A reader wrote me to let me know that there is a possibility of Memory Leak using this approach. here are his comments:
function populate(numPieces) {
var optionList = [];
for (var i = 0; i < numPieces; ++ i) {
var opt = newOptionDef.createObject();
opt.text = i;
opt.value = i;
optionList.push(opt);
}
pieces.removeAll();
pieces.options = optionList;
}
References:
- Cascades DropDown Class [developer.blackberry.com]
- Cascades CustomControl Class [developer.blackberry.com]
- Tutorial: Circular Slider [developer.blackberry.com]
- C++ and QML Integration [developer.blackberry.com]
- Dev Tools + Simulator download [developer.blackberry.com]
About
As part of my first BB10 application I want to present the user with a few options in a DropDown menu. The options will be different for each user, so I decided to dynamically add items into the DropDown. Unfortunately, while the DropDown class does expose an add(Option *option) method, there is no way of creating an Option object in QML code which means that if you use the stock DropDown control you will need to do any additions from C++.
Now I don't have anything against C++ (I've used it in the past with some degree of success), but for convenience I'd like to be able to add options from the QML layer. QML is designed for UI logic and I'd like to keep it all there if possible. To get around this I put together a CustomControl which essentially wraps the DropDown class with a method to add an option using QML/JavaScript.
If you want to cut to the chase, go to the bottom of the page to see the complete source code listing for the custom control.
The Complete source for this sample can be downloaded here.
Setup
- Download and install the BlackBerry NDK and Simulator from the Cascades download page
- Launch the QNX Momentics IDE (Should be in you Start Menu under BlackBerry 10 Native SDK)
- You'll be asked to specify a workspace. This is where all your project files will be stored.
- You'll see a Welcome screen. Go ahead and click the X on the Welcome Tab to see the real IDE
- Select File -> New -> BlackBerry Cascades C++ Project (Launches a wizard)
- Give the project a Name
- Select the Standard Empty Project option
- Click Finish
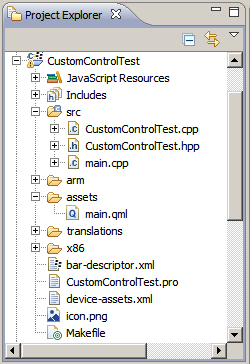
- You will see a project tree that looks something like this (as of NDK Beta 3):

Create the Control, Fill out the Header file (.h)
Once you have your sample project setup we can get on with creating the custom control. This custom control will be named DropDownList and will provide a DropDown control that has a helper method to add Options using QML / JavaScript. Complete Header source is at the end of this section.
Let's get started:
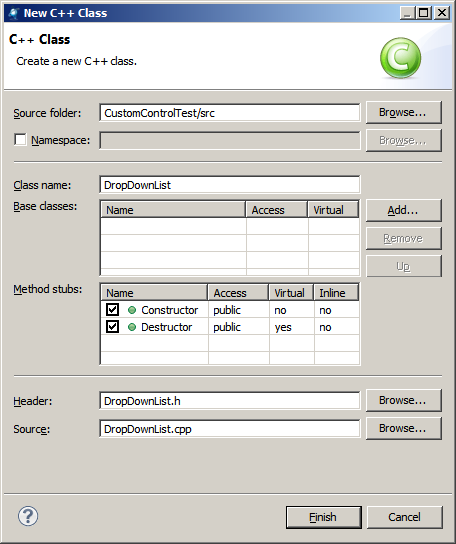
- Right click on the src folder and select New -> Class
- In the window that appears, enter DropDownList for the Class Name.

- Click Finish
- Now we need to add in some #include statements to the DropDownList.h file (Concrete5 messes with the open and close tags, so remove the spaces!):
-
#include < QObject>
#include < QString>
#include < bb/cascades/CustomControl>
#include < bb/cascades/DropDown>
#include < bb/cascades/Option> - Then we need to add a line which allows us to use the bb::cascades namespace. If we don't add this then the program will fail to compile:
- using namespace bb::cascades;
- Next, we need to alter the header file to show that our class derives from CustomClass. To do that we need to change this line:
- class DropDownList {
to be
- class DropDownList: public bb::cascades::CustomControl {
- Since Cascades is based on QT we need to make our custom class a QObject so things like signals and slots will work correctly. To make this happen we use the Q_OBJECT macro. Change these lines:
-
class DropDownList: public bb::cascades::CustomControl {
to look like this (note the Q_OBJECT squeezed in between the lines)
public: - class DropDownList: public bb::cascades::CustomControl {
Q_OBJECT
public: - Now that we have the basic header setup it is time to add in a couple of Q_INVOKABLE methods. All Q_INVOKABLE does is let you call your C++ methods from QML. Here I've defined a few methods (You can extend them to meet your needs):
/*
* Specify the Text and Value of the option you'd like to add
*/
Q_INVOKABLE
void AddOption(QString text, QString value);
/*
* Specify the Text and Value of the option you'd like to add
*/
Q_INVOKABLE
void SetTitle(QString text, QString value);
/*
* Clear the DropDown of all existing options
*/
Q_INVOKABLE
void Clear();
- With the methods defined, we just need to add an instance variable which will contain the core DropDown object:
private:
DropDown *ddown;
// Complete souce listing for CustomControlTest.h
#ifndef DROPDOWNLIST_H_
#define DROPDOWNLIST_H_
#include <QObject>
#include <QString>
#include <bb/cascades/CustomControl>
#include <bb/cascades/DropDown>
#include <bb/cascades/Option>
using namespace bb::cascades;
class DropDownList: public bb::cascades::CustomControl {
Q_OBJECT
public:
DropDownList();
virtual ~DropDownList();
/*
* Specify the Text and Value of the option you'd like to add
*/
Q_INVOKABLE
void AddOption(QString text, QString value);
Q_INVOKABLE
void SetTitle(QString text);
/*
* Clear the DropDown of all existing options
*/
Q_INVOKABLE
void Clear();
private:
DropDown *ddown;
};
#endif /* DROPDOWNLIST_H_ */
Fill out the Control's Implementation file (.cpp)
// Complete souce listing for DropDownList.cpp
#include "DropDownList.h"
DropDownList::DropDownList() {
// TODO Auto-generated constructor stub
this->ddown = new DropDown();
setRoot(ddown);
}
DropDownList::~DropDownList() {
// TODO Auto-generated destructor stub
}
void DropDownList::AddOption(QString text, QString value){
Option *option = new Option();
option->setText(text);
option->setValue(value);
qDebug() << "Option coming" << option;
this->ddown->add(option);
}
void DropDownList::SetTitle(QString text){
this->ddown->setTitle(text);
}
void DropDownList::Clear(){
this->ddown->removeAll();
}
Setup the Custom Control to be available from QML
To be able to use the CustomControl in QML you have to first register the custom control. This an be done in CustomControlTest.cpp by adding an #include to the DropDownList.h file then using qmlRegisterType in the Application constructor like this (The 2 relevant lines have been bolded):
// Complete souce listing for CustomControlTest.cpp
#include "CustomControlTest.hpp"
#include
#include
#include
#include "DropDownList.h" // ***** This MUST be added for qmlRegisterType to work
using namespace bb::cascades;
CustomControlTest::CustomControlTest(bb::cascades::Application *app)
: QObject(app)
{
// Register Custom Type
qmlRegisterType("my.DropDownList", 1, 0, "DropDownList");
// create scene document from main.qml asset
// set parent to created document to ensure it exists for the whole application lifetime
QmlDocument *qml = QmlDocument::create("asset:///main.qml").parent(this);
// create root object for the UI
AbstractPane *root = qml->createRootObject();
// set created root object as a scene
app->setScene(root);
}
Use the Custom Control from within QML
To use the Custom Control inside a QML file, add an import statement that reflects how you've registered your custom control. Once you register the DropDownList control you will need to Define it in QML then initialize it when the page loads. Since this is my first attempt at a Custom Control it is fairly crude. It can be changed to provide a more seamless way of setting it up. For now it is good enough for what I need.
Here is what the main.qml file will look like to work with this control (relevant lines have been bolded):
import bb.cascades 1.0
import my.DropDownList 1.0 // Must be added for the control to show up
// creates one page with a label
Page {
Container {
layout: DockLayout {
}
DropDownList{
id: dropDownList // This must have an id so we can work with it
}
}
onCreationCompleted: { // This runs after the page is created. It configure the DropDownList
dropDownList.SetTitle("Select Something:");
dropDownList.AddOption("test Option 1", "Test Value 1");
dropDownList.AddOption("test Option 2", "Test Value 2");
}
}
Final note: Complete source code for this example can be downloaded here
Update: 14-Oct-2012
Alternate method to populate a DropDown list using javascript WITHOUT having to use the custom control I created above. Thanks Dmitri!:
Dmitri Trembovetski commented on BBTEN-302:
-------------------------------------------

Use ComponentDefinition to define a component , create the object and add to the DropDown:

DropDown {
                id: scanResultDropdownSelector
                title: "Scan Run:"
                selectedIndex: 0
                horizontalAlignment: HorizontalAlignment.Center
                Option {
                    text: "Current"
                    value: "2012"
                }
                Option {
                    text: "2013"
                    value: "2013"
                }
                Option {
                    text: "2014"
                    value: "2014"
                }
            }

function addOptionToDropdown(){
    var newOption = newOptionDef.createObject();
    newOption.text = "2015";
    scanResultDropdownSelector.add(newOption);

}

attachedObjects: [
  ComponentDefinition {
       id: newOptionDef
       Option {}
  }
]
Update 2: 27-Dec-2012
When using the BB10 GOLD SDK I found some issues using this technique in a switch statement. See this article for details on how to work around the problem.
